The Web Management Suite - Multiple Devices User Guide
|
The Web Management Suite is an optional on-line service that supports the 2Build a Profile mobile app. Using the suite, you can:
You can access the suite from the following link: |
|
- 1. EXISTING USERS: To upload learners you already have in your app
- 2. NEW USERS: To add learners and classes with the Web Management Suite
- 3. Adding learner portrait photos (using the web suite)
- 4. Adding learner portrait photos (using the device)
- 5. Managing class lists directly from your device
- 6. Deleting learners
- 7. Generating Reports in the Web Management Suite
- 8. Overview summary
1. EXISTING USERS: To upload learners you already have in your app
Before starting this process, make sure you have emailed all of your observations as PDF files. This ensures that you have a backup of your observations in case anything happens to your device during this process.
|
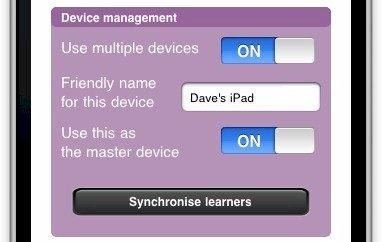
You can upload learners and portrait photos when device is set as the Master Device. Step 1.Ensure that the option to use as a master device is switched on in the app's settings. Step 2.Click on the "synchronise learners" button to upload the learners and portrait photos to the Web management Suite. |
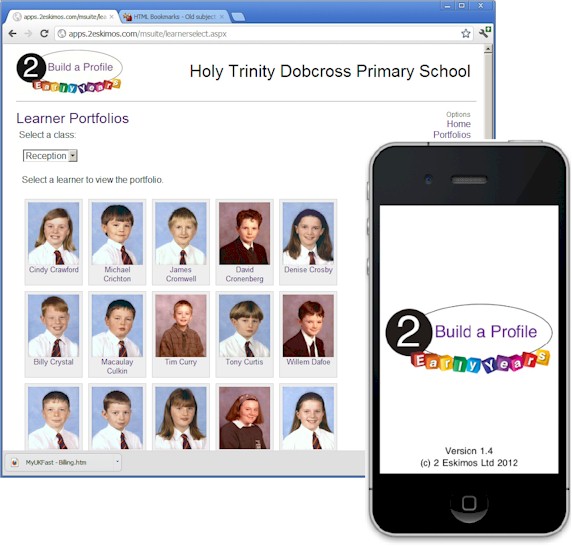
You can now log into the Web Management Suite at www.2buildaprofile.com and check what has uploaded.
|
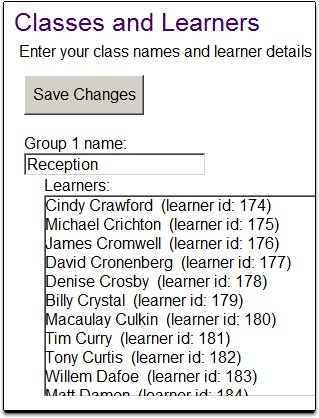
Step 3. Log into the Web Management Suite and click on "Class setup" Step 4. You can change the group name from "My Class" to something else Step 5. You can even add more classes and cut & paste learners into those classes. (When you cut and paste, cut the whoile line including the learner ID) Step 6. Press "Save changes" If you have more devices with existing learners on, you can now repeat the whole process from Step 1 with the next device. When you have uploaded the learners from all devices, continue to Step 7 below. |
|
Follow these steps to download the learners into your devices:
|
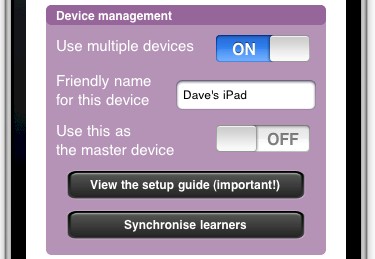
Step 7.In the app, turn on the "multiple devices" option on the setup screen. Once you do this, you can scroll down to further options. Step 8.Ensure that the option to "use as a master device" is switched off so that the Web Management Suite automatically becomes the master device. Step 9.Click the "Synchronise learners" button and confirm the warning. This will download the learners into your app on your device. |
You can now repeat steps 7,8,9 for all of the devices you have. Then you will have finished the transition to the Web Suite.
When using the app on a day-to-day basis, we recommend that the "use as master device" option is switched to the off position for all users. Master device should only be switched on if you want to edit learners directly from a device instead of the Web Management Suite. Just switch it on when needed and then switch off again.
Transferring your observations to the web suite
The Web Management Suite will begin tracking your observations once the learners have been set up as described above. Any observations taken prior to using the Web Management Suite will not be visible by default in the Web Suite. If you need your previous observations added to the Web Management Suite contact 2Simple to arrange this.
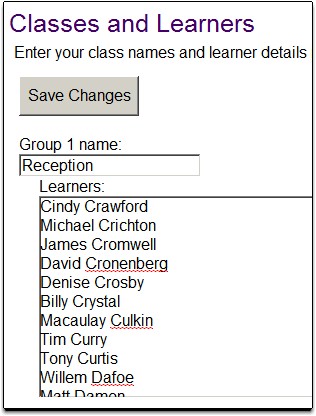
Learners and classes can be entered into the Web Management Suite and then synchronised to your devices. Learners can be typed in directly, or copy & pasted from spreadsheets or other documents. Step 1. Press on "Class setup" then enter your class names Step 2. Type or paste in your learner names and Press "Save Changes" Step 3. The learners are ready to be synchronised into your devices. Follow these steps to synchronise the learners into your devices:
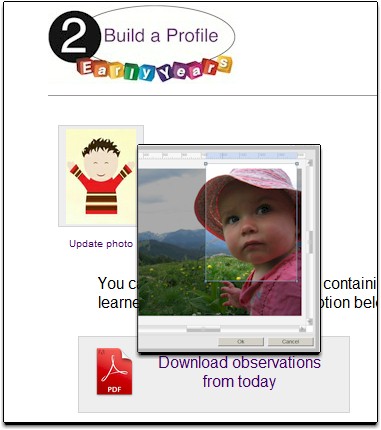
Step 4. In the app, turn on the "multiple devices" option on the setup screen. Once you do this, you can scroll down to further options. Step 5. Ensure that the option to use as a master device is switched off, because the Web Management Suite will be your master device. Step 6. Press the "Synchronise learners" button and confirm the warning. This will synchronise the learners into your app. When using the app on a day-to-day basis, we recommend that the "use as master device" option is switched to the off position for all users. Master device should only be switched on if you want to edit learners directly from a device instead of the Web Management Suite. Just switch it on when needed and then switch off again. You can add photos in 2 ways - either using the web suite or using your mobile device. To add photos using the Web Management Suite you must ensure that no photos have been previously added via the device. Step 1. To add a photo via the web suite, press the "Portfolios" menu option and select a learner. Then press "update photo" underneath the learner photo Step 2. Press "Browse" and select the photo from your PC. Step 3. Once the photo has uploaded, you can drag the "cropping bars" around the learner's face and then press "OK". Step 4. Then press "Save portrait". Photo portraits can also be captured on the device once you have synchronised the learners from the web suite on to your device (Step 2) You can edit learners and take portrait photos if your device is set as the Master Device.
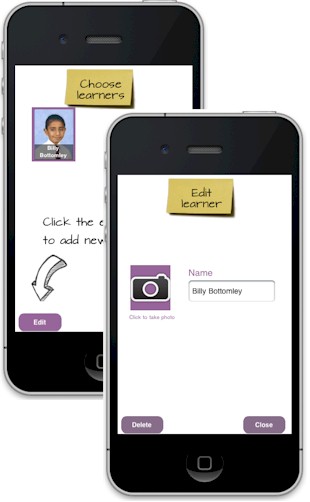
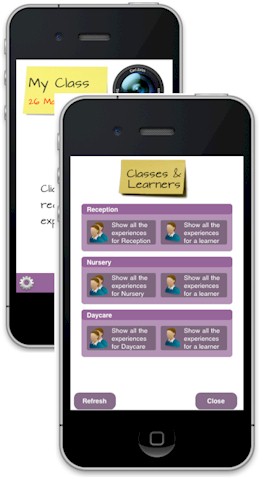
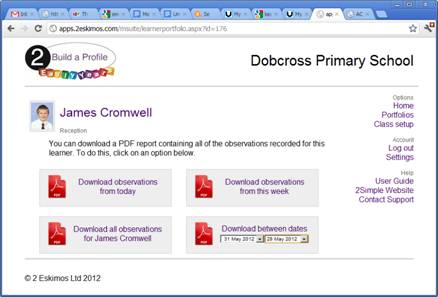
Step 1. Ensure that the option to use as a master device is switched on. Step 2.When in the "Classes & Learners" screen, press "Show all the experiences for a learner". Then press the "Edit" button at the bottom left hand side of the screen. Step 3.Click on the learner you want to edit. You can press on the camera to take a photo and add or edit the name. Then press "close" and when you have finished editing your learners press "Finish edit". Step 4.To synchronise the new information to the Web Management Suite go back into the settings page and press on the "synchronise learners" button. Some settings may not want the added functionality of using the Web Management Suite. In these cases it is possible to share class lists directly from the app itself. Step 1. In the app settings screen, allocate one of your devices as the Master Device. This device will be used for creating and managing your class lists. Step 2. To add a class go to the "Classes & Learners" screen and press edit. Separate class names with a comma and then press "OK". Step 3. To add learners go to the "Classes & Learners" screen and press "Show all experiences for a learner". Step 4. When in the "Classes & Learners" screen press "Show all the experiences for a learner". Then press the "Edit" button at the bottom left hand side of the screen. Step 5. Click on the learner you want to edit. You can press on the camera to take a photo and add or edit the name. Then press "Close" and when you have finished editing your learners press "Finish edit". Step 6. When you have added all your classes and learners press the "synchronise learners" button in settings to upload the classes and learners to the web Management Suite Step 7. In the settings screen on your other devices, ensure that the master device setting is OFF. Step 8. Go to the home page in the app and press "my class" text on the post it note. This will open the "Classes and Learners" page. Step 9. Press the "Refresh" button at the bottom of the classes and learners page. This will synchronise the learners into the app. When using the app on a day-to-day basis, we recommend that the "use as master device" option is switched to the off position for all users. Just switch it on when needed and then switch off again. If you need to delete a learner from your devices you can do this directly from the Web Management Suite. Step 1. When you are logged into the Web Management Suite press on "Class setup" and delete the learner’s name and ID. Step 2. Press "save changes" Step 3. In the settings screen on your other devices, ensure that the master device setting is OFF. Step 4. Go to the “Classes & Learners” screen and press the "refresh" button at the bottom of the classes and learners page. This will synchronise the learners into the app. You can quickly generate a PDF report for a learner. Step 1. Click on the ‘Portfolios’ menu option and select a class: Step 2. Once you have selected a learner, you can generate your report: You can either manage the class lists using the Web Management Suite or a device as the master device. If you add or edit your classes and learners directly via the Web Management Suite: Step 1. Make sure you have saved your changes in “Class set up” on the Web Management Suite. Step 2. With your device(s) go into settings to turn “Master device” off and then press “synchronise learners”. Step 3. This will synchronise the learners into your app. If you add or edit your classes and learner through a device: Step 1. Make sure this device has the "Master device" on within the settings. Step 2. After you added or edited your class list and learners press "Synchronise learners" within settings. Step 3. This will synchronise your class list and learners to the Web Management Suite. Step 4. To update the rest of your devices so they all have the same class lists and learners turn "Master device" off on the these devices and then press the "Refresh” button in the "Classes & Learners" screen. Once you have chosen to use the Web Management Suite or a device to manage your class lists, you should stick to it. It is not recommended to switch between editing your classes editing your classes in the Web Management Suite and on a master device.
2. NEW USERS: To add learners and classes with the Web Management Suite
3. Adding learner portrait photos (using the web suite)
4. Adding learner portrait photos (using the device)
5. Managing class lists directly from your device
6. Deleting Learners
7. Generating Reports in the Web Management Suite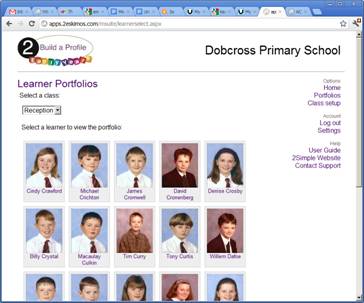
8. Overview SummaryManaging class lists with the Web Management Suite
Managing class lists with a device